<?xml version="1.0" encoding="utf-8"?><feed xmlns="http://www.w3.org/2005/Atom" xml:lang="en-US"><generator uri="https://jekyllrb.com/" version="4.1.1">Jekyll</generator><link href="https://jasoncrevier.com/feed.xml" rel="self" type="application/atom+xml" /><link href="https://jasoncrevier.com/" rel="alternate" type="text/html" hreflang="en-US" /><updated>2026-01-01T01:42:35+07:00</updated><id>https://jasoncrevier.com/feed.xml</id><title type="html">Jason’s blog</title><subtitle>Jason&apos;s personal blog</subtitle><author><name>Jason Crevier</name><email>jason@jasoncrevier.com</email></author><entry><title type="html">I built a Listenbrainz widget</title><link href="https://jasoncrevier.com/listenbrainz-widget/" rel="alternate" type="text/html" title="I built a Listenbrainz widget" /><published>2025-05-23T00:00:00+07:00</published><updated>2025-05-23T00:00:00+07:00</updated><id>https://jasoncrevier.com/listenbrainz-widget</id><content type="html" xml:base="https://jasoncrevier.com/listenbrainz-widget/"><![CDATA[<h1 id="bye-bye-spotify">Bye bye, Spotify</h1>
<p>As an alternative to Spotify, I recently started using using <a href="https://www.navidrome.org/">Navidrome</a>. For recommendations, I also started <a href="https://www.collinsdictionary.com/dictionary/english/scrobble">scrobbling</a> to <a href="https://listenbrainz.org">Listenbrainz</a>.</p>

<p>I thought it would be cool to embed a little widget onto my website to show what I was listening to, but I couldn’t find a Listenbrainz widget anywhere in the wild, so I built one myself.</p>

<h1 id="how-it-works">How it works</h1>
<p>The widget reaches out to the Listenbrainz API to see what I’m listening to (or what I last listened to) and displays it with a link that takes you to <a href="https://listenbrainz.org/user/jasoncrevier/">my Listenbrainz profile</a>.</p>

<p>Here’s what it looks like (you can also see it on the <a href="https://jasoncrevier.com">homepage</a>):</p>

<p><img src="https://jasoncrevier.com/assets/post-images/widget.png" alt="Screenshot of the widget" /></p>

<h1 id="its-jekyll-ready">It’s Jekyll ready</h1>

<p>Because I’m using <a href="https://jekyllrb.com/">Jekyll</a> to build my site, I built it as an Include, but it should be fairly easy to adapt it for use elsewhere.</p>

<p>You can find the source for it on the <a href="https://github.com/jasoncrevier/website">Github repo</a> that builds this site:</p>
<ul>
  <li>HTML: <a href="https://github.com/jasoncrevier/website/blob/master/_includes/now_playing.html">now_playing.html</a></li>
  <li>JavaScript: <a href="https://github.com/jasoncrevier/website/blob/master/assets/js/now_playing.js">now_playing.js</a></li>
</ul>]]></content><author><name>Jason Crevier</name><email>jason@jasoncrevier.com</email></author><category term="Listenbrainz" /><category term="Jekyll" /><category term="Navidrome" /><category term="JavaScript" /><category term="music" /><summary type="html"><![CDATA[A post detailing how and why I built a Listenbrainz now playing widget]]></summary></entry><entry><title type="html">Building an encrypted remote backup</title><link href="https://jasoncrevier.com/building-an-encrypted-remote-backup/" rel="alternate" type="text/html" title="Building an encrypted remote backup" /><published>2025-03-02T00:00:00+07:00</published><updated>2025-03-02T00:00:00+07:00</updated><id>https://jasoncrevier.com/building-an-encrypted-remote-backup</id><content type="html" xml:base="https://jasoncrevier.com/building-an-encrypted-remote-backup/"><![CDATA[<h1 id="why-i-built-this">Why I built this</h1>
<p>I’ve been keeping a portable hard drive (HDD) at someone else’s house as an off-site, emergency backup. I had an <a href="http://www.orangepi.org/html/hardWare/computerAndMicrocontrollers/details/Orange-Pi-Zero-3.html">Orange Pi Zero 3</a> handy and wanted to see if I could rig something up to access the drive remotely.</p>

<p>With this set up, I have a drive that:</p>
<ul>
  <li>lives off-site,</li>
  <li>can be accessed remotely,</li>
  <li>decrypts itself on boot,</li>
  <li>and can be accessed over <a href="https://tailscale.com/">Tailscale</a>.</li>
</ul>

<p><strong>Important note:</strong> as a friend pointed out, this is really a “key hidden under the mat” kind of security. The goal is really just to make it so someone can’t just unplug the drive, plug it into another computer, and see everything on it.</p>

<p>If you want to make sure your files are completely protected against prying eyes, make sure to encrypt them before putting them on the drive.</p>

<h1 id="create-the-encrypted-drive">Create the encrypted drive</h1>
<p>
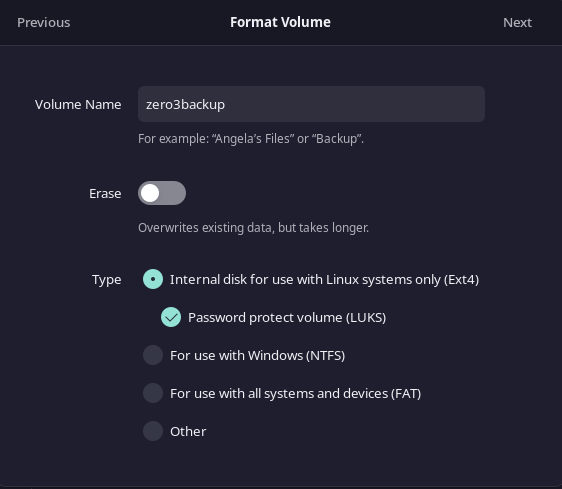
In order to keep the content on the disk secure, the first thing you need is an HDD encrypted with LUKS. My favorite way to do that is to use the Gnome <code class="language-plaintext highlighter-rouge">disks</code> application to format the drive.</p>

<p>I used these settings for my drive:</p>
<ul>
  <li>Volume Name: <code class="language-plaintext highlighter-rouge">zero3backup</code></li>
  <li>Type: Internal disk for use with Linux systems only (Ext4)
    <ul>
      <li>Password protect volume (LUKS)</li>
    </ul>
  </li>
</ul>

<p><img src="https://jasoncrevier.com/assets/post-images/gnome-disks-encrypt.png" alt="gnome-disks-encrypt" /></p>

<h1 id="install-cryptsetup">Install <code class="language-plaintext highlighter-rouge">cryptsetup</code></h1>
<p>On an <a href="http://www.orangepi.org/html/hardWare/computerAndMicrocontrollers/details/Orange-Pi-Zero-3.html">Orange Pi Zero 3</a> running <a href="https://www.armbian.com">armbian</a> (based on <a href="https://www.debian.org/">debian</a> 12 at the time of writing), you can install <code class="language-plaintext highlighter-rouge">cryptsetup</code> with this command:</p>

<figure class="highlight"><pre><code class="language-bash" data-lang="bash"><span class="nb">sudo </span>apt <span class="nb">install </span>cryptsetup</code></pre></figure>

<p><code class="language-plaintext highlighter-rouge">cryptsetup</code> is a command-line utility for managing disk encryption.</p>
<h1 id="create-and-use-a-keyfile">Create and use a keyfile</h1>
<p>In order to unlock the drive without entering the passphrase whenever the computer reboots, you can create a keyfile to unlock the encrypted partition.</p>

<p><strong>Here’s how to do that:</strong></p>
<h2 id="1-create-a-keyfile">1. Create a keyfile</h2>
<p>To create a keyfile, you can use <code class="language-plaintext highlighter-rouge">dd</code> to generate a random file. This file will serve as the key that automatically unlocks the encrypted volume.</p>

<figure class="highlight"><pre><code class="language-bash" data-lang="bash"><span class="nb">sudo dd </span><span class="k">if</span><span class="o">=</span>/dev/random <span class="nv">of</span><span class="o">=</span>/root/my_keyfile <span class="nv">bs</span><span class="o">=</span>1024 <span class="nv">count</span><span class="o">=</span>4 <span class="nb">sudo chmod </span>0400 /root/my_keyfile</code></pre></figure>

<ul>
  <li><code class="language-plaintext highlighter-rouge">/dev/random</code> is used to generate random data.</li>
  <li>The <code class="language-plaintext highlighter-rouge">bs=1024 count=4</code> parameters define the size of the keyfile (in this case, 4 KB).</li>
  <li>The <code class="language-plaintext highlighter-rouge">chmod 0400</code> command ensures that only root can read the keyfile, making it more secure.</li>
</ul>

<h2 id="2-add-the-keyfile-to-the-luks-partition">2. Add the keyfile to the LUKS partition</h2>
<p>Next, you need to add the keyfile to the LUKS partition. Run the following command to add the keyfile to the LUKS header:</p>

<figure class="highlight"><pre><code class="language-bash" data-lang="bash"><span class="nb">sudo </span>cryptsetup luksAddKey /dev/sda1 /root/my_keyfile</code></pre></figure>

<p>You will be prompted to enter the current passphrase for the LUKS volume (the password you set during encryption). Once you enter it, the keyfile will be added to the partition, allowing it to be used for unlocking the drive.</p>

<h2 id="3-update-etccrypttab-to-use-the-keyfile">3. Update <code class="language-plaintext highlighter-rouge">/etc/crypttab</code> to use the keyfile</h2>
<p>Now that the keyfile is created and associated with your LUKS partition, you need to modify <code class="language-plaintext highlighter-rouge">/etc/crypttab</code> to use the keyfile to unlock the encrypted volume automatically during boot.</p>

<p>Edit <code class="language-plaintext highlighter-rouge">/etc/crypttab</code>:</p>

<figure class="highlight"><pre><code class="language-bash" data-lang="bash"><span class="nb">sudo </span>nano /etc/crypttab</code></pre></figure>

<p>Add the following entry:</p>

<figure class="highlight"><pre><code class="language-bash" data-lang="bash">zero3backup /dev/sda1 /root/my_keyfile luks <span class="c"># Replace "zero3backup" with your volume name</span></code></pre></figure>

<p>This tells the system to use the keyfile <code class="language-plaintext highlighter-rouge">/root/my_keyfile</code> to unlock <code class="language-plaintext highlighter-rouge">/dev/sda1</code> during boot.</p>
<h2 id="4-update-the-initramfs">4. Update the <code class="language-plaintext highlighter-rouge">initramfs</code></h2>
<p>Once you’ve edited <code class="language-plaintext highlighter-rouge">/etc/crypttab</code>, update the <code class="language-plaintext highlighter-rouge">initramfs</code> to apply the changes:</p>

<figure class="highlight"><pre><code class="language-bash" data-lang="bash"><span class="nb">sudo </span>update-initramfs <span class="nt">-u</span></code></pre></figure>

<h2 id="5-configure-etcfstab">5. Configure <code class="language-plaintext highlighter-rouge">/etc/fstab</code></h2>
<p>If you want the decrypted partition (<code class="language-plaintext highlighter-rouge">/dev/mapper/zero3backup</code>) to automatically mount at boot, you’ll need to add it to <code class="language-plaintext highlighter-rouge">/etc/fstab</code>. This step is necessary to  define  the mount point.</p>

<p>First, create the mount point:</p>

<figure class="highlight"><pre><code class="language-bash" data-lang="bash"><span class="nb">sudo mkdir</span> <span class="nt">-p</span> /mnt/zero3backup <span class="c"># Replace "/mnt/zero3backup" with whatever you want your mount point to be</span></code></pre></figure>

<p>Then, edit the <code class="language-plaintext highlighter-rouge">/etc/fstab</code> file:</p>

<figure class="highlight"><pre><code class="language-bash" data-lang="bash"><span class="nb">sudo </span>nano /etc/fstab</code></pre></figure>

<p>Add a line to mount the decrypted device:</p>

<figure class="highlight"><pre><code class="language-bash" data-lang="bash">/dev/mapper/zero3backup /mnt/zero3backup ext4 defaults 0 2</code></pre></figure>

<h2 id="6-reboot-and-test">6. Reboot and test</h2>
<p>Now, when you reboot, the system will automatically unlock the drive using the keyfile and mount it if you’ve configured it in <code class="language-plaintext highlighter-rouge">/etc/fstab</code>.</p>]]></content><author><name>Jason Crevier</name><email>jason@jasoncrevier.com</email></author><category term="homelab" /><category term="pi" /><category term="encryption" /><category term="LUKS" /><category term="backup" /><category term="gnome" /><category term="armbian" /><category term="debian" /><category term="tailscale" /><summary type="html"><![CDATA[Instructions for building a LUKS encrypted, off-site backup target]]></summary></entry><entry><title type="html">Welcome!</title><link href="https://jasoncrevier.com/welcome/" rel="alternate" type="text/html" title="Welcome!" /><published>2024-08-05T00:00:00+07:00</published><updated>2024-08-05T00:00:00+07:00</updated><id>https://jasoncrevier.com/welcome</id><content type="html" xml:base="https://jasoncrevier.com/welcome/"><![CDATA[<h1 id="welcome-to-my-site">Welcome to my site!</h1>
<h2 id="home-sweet-home">Home, sweet home</h2>
<p>I’ve wanted to create a homepage for myself for a while now, especially after buying <code class="language-plaintext highlighter-rouge">jasoncrevier.com</code> – but I was never quite sure what it should be for.</p>

<p>Should it be a blog? Should it just link to other sites I use? Should it be a resume?</p>

<p>Where I really saw a need was when I noticed that I was constantly going back to find old videos or articles to remind myself of a linux command or a process. I noticed that often these would be links to people’s personal blog where they had written down the process to refer to themselves, which then became useful to other people.</p>

<p>I started doing the same in <a href="https://obsidian.md/">Obsidian</a> (a really sleek, markdown-driven note-taking app). For example, having it open while I set up a new system, and writing down all the steps and commands I used.</p>

<p>I wanted to share some of these notes with the world, and it occurred to me that if I could find a way to write up my content in Obsidian, and then use a few commands to publish it to the web, then boom, there’s my personal homepage.</p>

<p>So I set out looking for a way to do it.</p>
<h2 id="static-sites-are-alright">Static sites are alright</h2>
<p>Markdown is designed to convert nicely into HTML. So it stood to reason that someone must have tackled this idea of drafting everything in markdown and then automagically converting it into a website.</p>

<p>The answer came in the form of static site generation. That is, a site driven by plain HTML, CSS, and some light JS. You create the content, publish it, and it stays as is until you publish it again. That means it’s simple, lightweight, and blazingly fast.</p>

<p>The most popular static site generators I could find were:</p>
<ul>
  <li>Hugo</li>
  <li>Jekyll</li>
  <li>Pico CMS</li>
  <li>Gatsby</li>
</ul>

<p>I played around with a few, and landed on Jekyll. I found a theme, added a little flavour, and here we are! I’m tempted to get a little more into the technical side here, but I think I’ll save it for a future post.</p>
<h2 id="see-you-around">See you around</h2>
<p>I’ll start populating this feed with mainly notes about my adventures in Linux and self-hosting, but also anything else that comes to mind. Come back later to see it all.</p>]]></content><author><name>Jason Crevier</name><email>jason@jasoncrevier.com</email></author><category term="first" /><category term="obsidian" /><category term="markdown" /><category term="blogging" /><summary type="html"><![CDATA[Welcome post introducing readers to the site]]></summary></entry></feed>